When it comes to motorcycles, we all want that extra boost of power and adrenaline rush. One way to achieve this is by installing a nitro system on your bike. Nitro systems, also known as nitrous oxide systems, can provide a significant increase in horsepower and torque, giving your motorcycle that extra edge on the road or track. In this step-by-step guide, I will walk you through the process of building a nitro system for your motorcycle, from understanding the benefits to installation and maintenance.
Understanding the benefits of a nitro system
Before diving into the technicalities of building a nitro system, it’s essential to understand the benefits it can bring to your motorcycle. A nitro system works by injecting nitrous oxide, a colourless and non-flammable gas, into the engine’s combustion chamber. This additional oxygen-rich fuel allows for a more efficient burn, resulting in increased horsepower and torque.
One of the significant advantages of a nitro system is the instant power delivery it provides. When you activate the system, you’ll experience an immediate surge of power, giving you that extra boost you need for overtaking or accelerating. Moreover, nitrous oxide is relatively inexpensive compared to other performance-enhancing modifications, making it an attractive option for motorcycle enthusiasts on a budget.
Safety precautions and considerations
While a nitro system can undoubtedly enhance your motorcycle’s performance, it’s crucial to prioritize safety throughout the entire process. Safety precautions are essential during installation, usage, and maintenance of the nitro system. Here are some key considerations to keep in mind:
- Follow manufacturer guidelines: Before starting the installation process, carefully read and understand the instructions provided by the manufacturer of your nitro components and equipment. Following these guidelines ensures that you are installing and using the system correctly.
- Proper ventilation: Nitrous oxide is a potent gas that should be handled with caution. Ensure that your workspace has proper ventilation to prevent the accumulation of nitrous oxide fumes, which can be harmful when inhaled.
- Safety equipment: Always wear appropriate safety equipment, including gloves and goggles, when working with nitrous oxide. This will protect you from potential hazards and ensure your safety throughout the process.
Step-by-step guide to building a nitro system for your motorcycle
Now that we understand the benefits and safety considerations, let’s dive into the step-by-step process of building a nitro system for your motorcycle. This guide will walk you through the essential stages, from choosing the right components to testing and tuning your system.
Choosing the right nitro components and equipment
The first step in building your nitro system is selecting the right components and equipment. Here are the key components you’ll need:
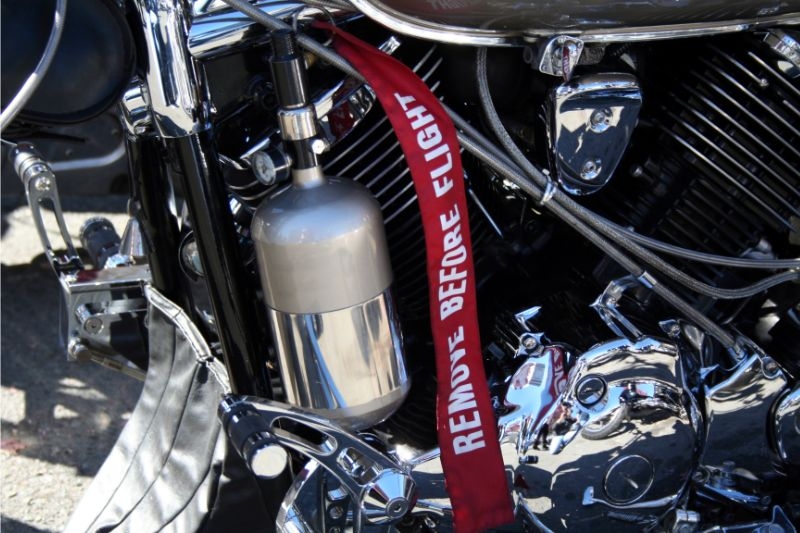
- Nitrous Oxide Bottle: This is where the nitrous oxide is stored. Choose a bottle size that suits your needs and ensure it is designed for motorcycle use.
- Nitrous Solenoids: These are electrically operated valves that control the flow of nitrous oxide from the bottle to the engine. Select solenoids that are compatible with your motorcycle’s engine and have the appropriate flow rate.
- Fuel System Upgrades: To ensure the proper mix of fuel and nitrous oxide, you may need to upgrade your motorcycle’s fuel system. This may include larger fuel injectors, a high-flow fuel pump, and a dedicated fuel pressure regulator.
Installation process and best practices
Once you have gathered all the necessary components, it’s time to install your nitro system. Here are the steps to follow:
- Prepare your motorcycle: Before starting the installation, ensure your motorcycle is in good working condition. This includes checking the engine, fuel system, and electrical connections.
- Mount the nitrous oxide bottle: Choose a secure location to mount the nitrous oxide bottle on your motorcycle. Ensure it is easily accessible for refilling and maintenance.
- Install the nitrous solenoids: Connect the nitrous solenoids to the intake manifold and fuel system, following the manufacturer’s instructions. Double-check all connections to ensure they are secure.
Testing and tuning your nitro system
Now that your nitro system is installed, it’s time to test and tune it for optimal performance. Follow these steps to ensure everything is working correctly:
- Perform a leak test: Before testing the system, perform a thorough leak test to ensure there are no leaks in the nitrous lines or fittings. Use a leak detection solution and check all connections.
- Start with a small shot: Begin by testing your nitro system with a small shot, gradually increasing the nitrous oxide flow as you monitor the engine’s performance. This allows you to fine-tune the system and ensure it is delivering the desired results.
- Monitor engine parameters: While testing, closely monitor your motorcycle’s engine parameters, including air-fuel ratio, fuel pressure, and ignition timing. This will help you identify any issues and make necessary adjustments.
Maintaining and troubleshooting your nitro system
To ensure the longevity and optimal performance of your nitro system, regular maintenance is essential. Here are some maintenance tips and troubleshooting techniques to keep in mind:
- Regularly inspect connections: Periodically check all connections and fittings in your nitro system for any signs of wear or damage. Replace any worn-out parts promptly.
- Keep the nitrous oxide bottle filled: Ensure your nitrous oxide bottle is always adequately filled to avoid running out during a ride. Regularly check the pressure gauge and refill as needed.
- Troubleshooting common issues: If you encounter any problems with your nitro system, such as inconsistent performance or leaks, consult the manufacturer’s troubleshooting guide or seek professional assistance.
Safety tips for using a nitro system on your motorcycle
While a nitro system can provide an exhilarating experience, it’s crucial to use it responsibly. Here are some safety tips to keep in mind when using a nitro system on your motorcycle:
- Practice in controlled environments: When first using your nitro system, practice in a controlled environment such as a racetrack or closed course. This allows you to get accustomed to the additional power and learn how to handle your motorcycle safely.
- Avoid excessive use: Nitrous oxide is a powerful tool, but excessive use can put unnecessary strain on your motorcycle’s engine. Use your nitro system sparingly and only when necessary.
- Regularly inspect and maintain: Regularly inspect and maintain your nitro system to ensure it is in proper working condition. This includes checking for leaks, monitoring pressure levels, and replacing worn-out parts.
Conclusion: Enjoy the thrill of a nitro-powered ride
Building a nitro system for your motorcycle can be an exciting and rewarding process. By following this step-by-step guide, you can safely and confidently install a nitro system that will give your motorcycle that extra boost of power. Remember to prioritize safety at every step of the process and enjoy the thrill of a nitro-powered ride responsibly. So, rev up your ride and experience the adrenaline rush that a nitro system can provide!